Love this tiny airplane, via Hackaday.
http://hackaday.com/2014/11/11/tiny-rc-p-51d-mustang-tips-the-scales-at-3-grams/
WigglePin
Anything and everything about embedded micro controllers, with some humor thrown in.
Tuesday, November 11, 2014
Thursday, February 6, 2014
The Smart Scope Oscilloscope
I came across this awesome kickstarter. The SmartScope is a 100M/S (45Mhz) oscilloscope that is compatible with PC/MAC/Android/IOS. Although it looks like you need to jailbreak for IOS. It also packs a 100M/S digital logic analyzer and an arbitrary wave form generator! The UI looks pretty polished as well. I hope that the logic analyzer would decode UART/SPI/IIC/Etc. There are still some slots open for $179, a great price for a 3-in-1 tool.
Check it out!
https://www.kickstarter.com/projects/751733865/smartscope-reinventing-the-oscilloscope
Sunday, December 22, 2013
Glove controlled 3d printed robot hand with Arduino.
The 3D printed hand has been going around the 'net lately, many people have been adding servos to make the fingers move. Dschurman put up an instructable that takes the robot hand the next level.
The design of the hand comes from a project called inmoov. It can be found here http://inmoov.blogspot.com. The plastic parts for the hand are open source and are available to download from the website.
The goal of inmoov is to build parts for life-sized humanoid robots, an interesting project in itself! If you have a 3D printer or and excuse to buy one, check it out!
Anyway, dschurman decided that he would like to update the design so that the fingers on the plastic hand can be controlled via your fingers in a glove. To accomplish this, the instructable shows you how to attach resistive flex sensors to a glove. An Arduino Uno reads the signals from the glove and controls the 5 servos that are used to manipulate the robot hand. Arduino code is provided.
I really want to see someone make "Thing" from the Adams family. Having this thing run around the house on Halloween would be sweet!
Dschurman estimates the project costs about $100-$150 in parts (as long as you have access to a 3d printer, otherwise this project may get a lot more expensive :) ).
Check out the video!
http://www.instructables.com/id/DIY-Robotic-Hand-Controlled-by-a-Glove-and-Arduino/
Regardless of the coolness factor, $150 for a prosthetic hand is a hell of a deal. Its amazing what you can do with a little programming and a 3d printer. You would think that this project is very close to be modified to allow someone to control it who has lost his/her hand. I can't help but to think of the scene in Star Wars where Luke is getting a prosthetic hand after his battle with Darth Vader!
Friday, December 20, 2013
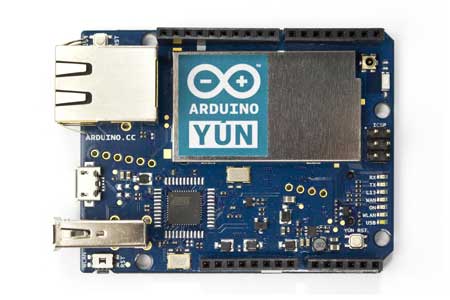
The Yún is an Arduino Powerhouse
When I think Arduino, I usually think small AVR base micro developing board. When I saw the specs for the Yún, I thought holly crap, this is a PC with an Arduino soldered to it. The Yùn is a hybrid system consisting of a large, powerful 400mhz CPU running Linux, and a Arduino Leonardo (running your sketches). You basically get the best of both worlds.
The Linux portion of the system is based on a MIPS Atheros AR 9331 running at 400MHz. This CPU is connected to 64Mb of DDR2 RAM and 16Mb of onboard flash. Also connected is an wired Ethernet port (100Mb), Wifi (802.11b/g/n), USB host port and micro SD card slot. The Linux CPU runs a version of Linux called OpenWRT. The Arduino code communicates with the Linux CPU with a "Bridge API". You can even write your own shell and python scripts.
The Arduino side of things has its own micro USB port to upload the sketches. The micro is a ATMega32u4 (basically a Leonardo, but some of the IO is used for the Bridge API). If you are used to high level programming, you can roll your own Linux distro and I bet you can even run your own apps.
The Bridge API allows you to access:
This would be a cool option to use for home automation or maybe even some sort of web based monitoring tool.
Check out the Arduino web page:
http://arduino.cc/en/Main/ArduinoBoardYun
This board is usually around $72-$80 and is sold at multiple sites.
SeeedStudio for example:
http://www.seeedstudio.com/depot/arduino-yÚn-p-1616.html?cPath=6_7
The Bridge API allows you to access:
- The command line console.
- The file system (reads and writes to the SD card or connected USB drive).
- Allows you to do HTTP requests.
- Allows you to run a server.
- You can spawn processes.
- Much More!
This would be a cool option to use for home automation or maybe even some sort of web based monitoring tool.
Check out the Arduino web page:
http://arduino.cc/en/Main/ArduinoBoardYun
This board is usually around $72-$80 and is sold at multiple sites.
SeeedStudio for example:
http://www.seeedstudio.com/depot/arduino-yÚn-p-1616.html?cPath=6_7
Thursday, December 19, 2013
Controlling A Print Head With An Arduino and InkShield!
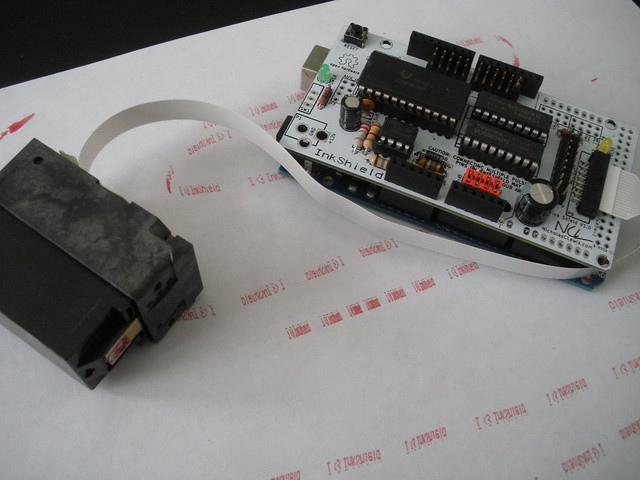
Over the past couple of years, every now and then I see someone who has figured out how to control the little piezo electric print heads on print cartridges. This technology is pretty interesting. Basically, certain types of inkjet printer cartridges have the nozzles built right into the plastic housing of the cartridge. The main bulk of the printer is dedicated to moving the cartridge around. Something along the lines of 18V applied to the right pins, cause little droplets of ink to shoot out. If done with the right timing, an image appears.
NicholasCLewis has created a product called the InkShield. This Arduino compatible board can control an HP C6602 type inkjet cartridge. Just start the code up and wave the inkjet cartridge over some paper (or something else) and viola, your design is printed onto the object! The InkShield has circuitry on board to convert the 9-12V input to the 18.2 volts needed to run the cartridge. No wonder these things are so expensive!
Here is the kickstarter, check out the video.
http://www.kickstarter.com/projects/nicholasclewis/inkshield-an-open-source-inkjet-shield-for-arduino
The author over at SpritesMods.com has also put up a project entitled "Electronic Stamp". The concept here is along the same lines, but the resulting machine is more like a magic fairy-wand-printer.
Here is the link
http://spritesmods.com/?art=inker&page=2
This project gets into the nitty-gritty of the technical issues surrounding how to control an HP print head. Since the above page is not meant to sell a product, the author provides lots of information and a circuit diagram. They can even print onto the foam on top of a beer!
Wednesday, December 18, 2013
Convert an RC car to Arduino Robot Platform
Randofo over at Instructables posted quite a writeup on converting a RadioShack RC car to Arduino robot. In fact, it looks like you can acquire all the parts at your local RadioShack.
This main guts of the project are based on an Arduino Uno and a Arduino motor shield. Randofo removes the stock innards and wires the motors to the motor shield. This particular truck has a single rear drive motor and one steering motor. I would think that just about any cheap RC car would work. The explanation is pretty light, but I think the ultrasonic transducers are for object avoidance.
The project is well documented with step-by-step pictures. I especially like the build quality. The whole unit looks like it would be pretty solid. The entire unit is powered by an off the shelf 9V battery. The only upgrade I would suggest would be a better battery pack. I would imagine that those motors would drain that 9V battery in no time. A rechargeable would be great, maybe the Lithium Polymer shield? And I bet you could charge it with the 5V USB connection.
This project would be a great starting point to learn motor control and ultrasonic transducers! Arduino code is provided.
Check it out!
http://www.instructables.com/id/RC-Car-to-Robot/
Wednesday, December 11, 2013
Create your own video game system with Gameduino!
Ever want to make your own handheld video game system, but the thought of learning linear algebra make you break out into a cold sweat? Have no fear! The Gameduino (2) is here! This cool board has an integrated FT800 graphics engine for controlling the display and running the audio output. Some of the demos are only a few handfuls of lines of code, you could literally get started in a few minutes of copying and pasting.
The Gameduino features the following hardware.
- Arduino shield form factor
- 4.3" color display
- touch controls (resistive)
- Accelerometer
- SD card for storing game resources (graphics, sounds)
- Audio amplifier
- FT800 Graphics processor.
The demos look silky smooth and polished.
Even if you weren't using this for a gaming system, it would work well to host a very nicely polished UI for your projects. Maybe even something to hang on the wall for home automation? Plus all the complexity of controlling an LCD display and touch interface are handled for you.
Available at seeedstudio for $59
http://www.seeedstudio.com/depot/gameduino-2-p-1676.html
Check out the demo projects!
http://excamera.com/sphinx/gameduino2/
The kickstarter has launched!
http://www.kickstarter.com/projects/2084212109/gameduino-2-this-time-its-personal
Subscribe to:
Posts (Atom)


